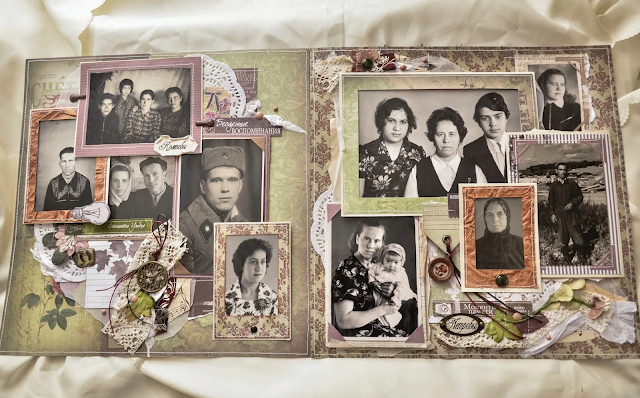
Each of us has a lot of photographs that keep the memory of our loved ones, friends, relatives, memorable events and beautiful places that we visited. Modern technology allows you to take high-quality photos with high resolution quickly and easily, besides, the camera is now always at hand – all modern mobile phones have the ability to take pictures. And it would be great to have a simple and functional system for storing and viewing these photos.
General description
This program will allow you not only to view your photos, but also provide them with a description, as well as tags – keys, by combining which you can quickly find the desired image.
The second interesting feature is the compilation of albums, which are a presentation: each screen can include several photos, decorative images and text descriptions that will be stored in the database. When you start a presentation, the screens change at a specified interval using visual transitions. You can also adjust the soundtrack, and by clicking on the photo, you can expand it to full screen.
Business model
Adding and storing images: photos (jpg files), decorative elements (png, jpg files).
Images are tagged: title, text description, creation date, audio description.
You can attach one or more tags to images.
The tag has the following properties: title, category. Tag category options: places, times, persons, emotions, decor, etc.
When you add a photo, it is copied to the storage (a special folder on the disk) and renamed. The name in the repository matches the record ID in the database.
A thumbnail is created for the image: a smaller version of the file that is used in the image list view. The thumbnail is stored in the repository, has a name that matches the name of the main image, but with the prefix “m”.
Images can be organized into albums. The album has a title and description. The album consists of pages.
The page contains one or more elements: an image from a database or free text. The location of the elements is set statically when the page is created.
A cover thumbnail is created for the album – the image of the first page of the album.
For each album page, a thumbnail is created and used when editing the album.
The album can be viewed as a presentation: for each page, you can set the display time, you can set the sound for the album, the page changes through the specified visual effect.
For the image search result, you can create a dynamic album – a presentation based on a fixed template.
For images, you can set a hint area – a rectangular area, when you hover over it, a frame and an inscription appear. For example, this can be used to refer to who is in the photo. Tips are displayed in single image full screen view. The tooltip area is relative to the image size, so it scales easily with the image.
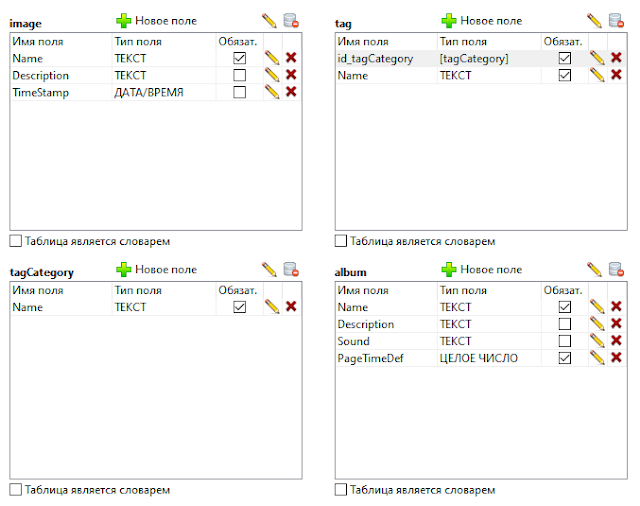
Data Model
Image
- Name
- Description
- Date of creation
Tag
- Tag Category
- Title
Tag category
- Name
Image tags
- Image
- Tag
Album
- Name
- Description
- Audio (playlist)
- Default page display time
Album page
- Album
- Sequence number
- Page time
- Visual transition effect
Visual transition effect
- Name
Album item
- Image
- X Position
- Y Position
- Width
- Height
- Text
- Font name
- Font size
- Font color
Image hints
- Image
- X Position
- Y Position
- Width
- Height
- Text
Data Presentation
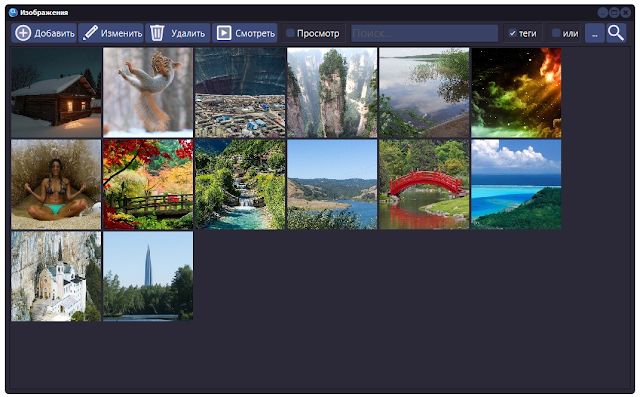
The main form is the albums form.
On the form of albums there is an area for viewing thumbnails of album covers and a search panel, a toolbar with control buttons: adding, editing, deleting, switching to the image database editing mode, launching an album in presentation mode.
On the form of the image base there is an area for viewing thumbnails of images and a search panel, a toolbar with control buttons: adding, editing, deleting, switching to the mode of working with albums.
Project implementation
Database
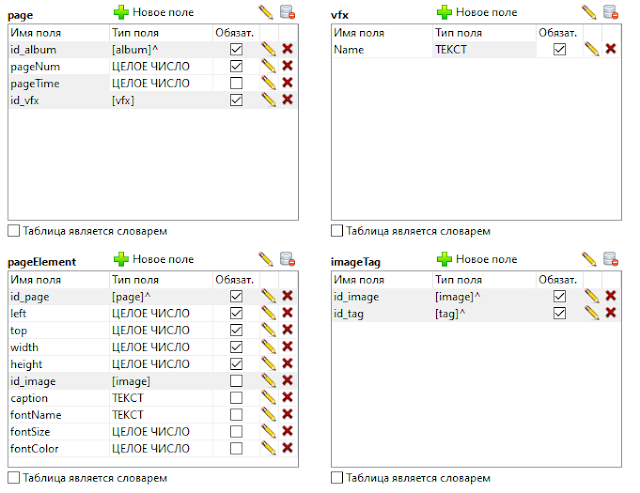
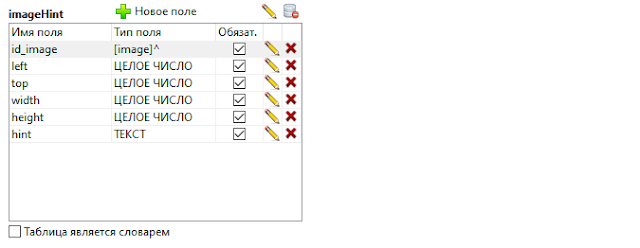
Data Schema
Result
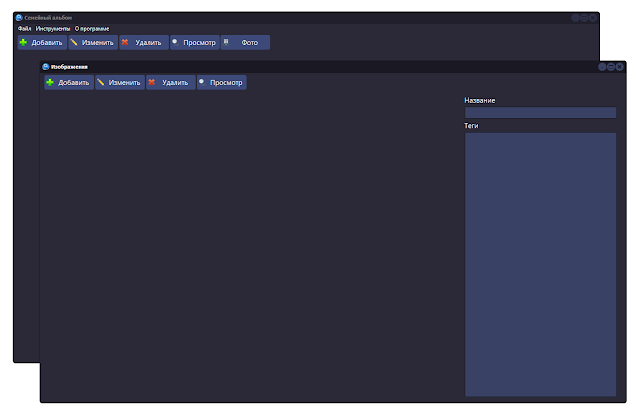
The project turned out to be quite large in terms of implementation, so my Napoleonic plans to create one project a day were wrecked. So far, the outlines for two forms are ready: the list of albums and the list of images.
Creating a data structure and forms in My Visual Database is undoubtedly a fast and exciting process, but in this case it is necessary to implement quite complex functionality, namely:
- Creating thumbnails for images
- Creating a thumbnail display routine
- Album editor
- Image hint editor
It is possible to display thumbnails using standard interface elements (table), but I want to make an adaptive display: so that the number of elements horizontally and vertically changes depending on the size of the form. The level of technology is growing rapidly, and FullHD resolution is not the limit, the user may have a 2K or even 4K display at his disposal. And vice versa – someone only has a laptop that barely pulls HD.
The album editor is similar in complexity to MS PowerPoint, which can also delay the development process somewhat, so the first version of the program will most likely be released without albums, but with a full-featured image storage and an advanced search system.
Image gallery
View images as a gallery of mini-images. Such functionality will be useful not only in the Family Album, but also in other programs focused on storing images.
Thumbnails
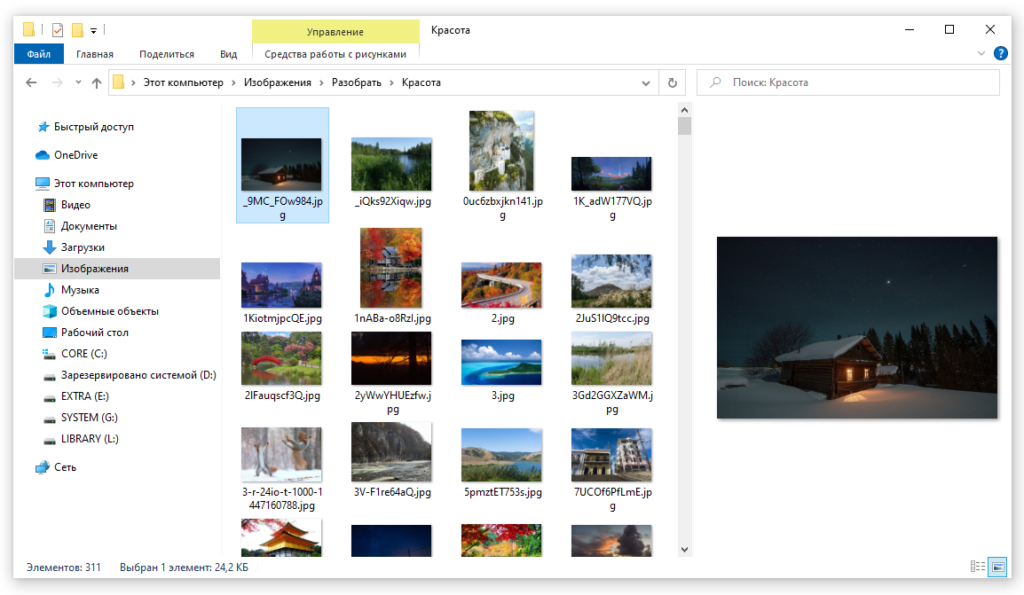
The principle of the gallery is based on the fact that for each image a thumbnail is created – a reduced copy of the image with a given size. The standard program “Explorer” does the same: for each image in the folder, it automatically creates a thumbnail, which displays in the main part of the screen if the “Large Icons” view mode is selected. And on the right, the viewport of the selected image can be reflected, the size of which can be changed.
Unfortunately, My Visual Database will not be able to automatically create thumbnails due to the limited ability to work with image components. Therefore, the thumbnails in the Family Album will be created by the user himself, manually defining the area that will be displayed on the thumbnail image. However, this is even good, since the gallery should consist of square images, and the original images can be with any aspect ratio. Therefore, only the user can decide what exactly should be displayed on the thumbnail.
Data storage
The second important point is how the images are stored. Although the SQLite and MySQL databases allow you to store images directly in the database, this method is not suitable for storing large amounts of data, as it will noticeably slow down the system. Therefore, the original pictures, as well as thumbnails, will be stored in the file storage – a folder on the disk next to the database.
To simplify the search system, the name of the original image file will consist of the post ID and extension, and the thumbnail ID will have the thumbnail type added to the ID.
The thumbnail type is the ability to extend the functionality of the storage system in the future so that it can be used in other projects. For example, an HR department might want an additional thumbnail view of a 3×4 profile photo, while a department structure tree might need circle thumbnails.
The thumbnail file extension (storage format) will be fixed – JPG is well suited for such purposes. But we will write the extension of the original file to the database – it will be needed to load the image into the visual components.
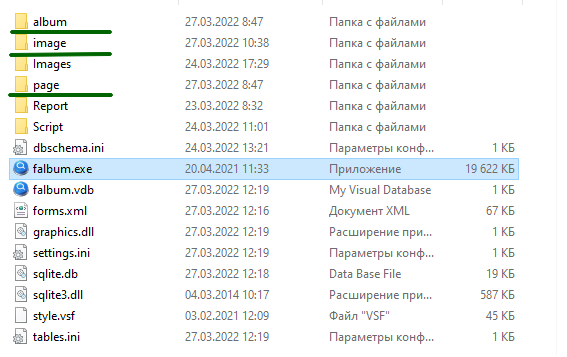
The family album will use three folders for storing images, which are named the same as the corresponding database tables:
- album – album cover thumbnails
- image – original images and thumbnails of photographs and decorative images
- page – album page thumbnails
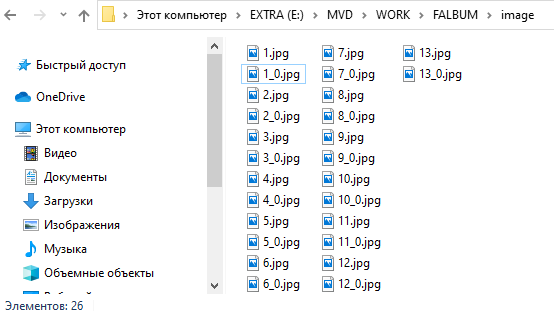
There will be only one thumbnail type – a square picture for display in a gallery of 150×150 pixels. The type is encoded with the number 0, which is separated from the name by an underscore character. Therefore, the folder with image files looks like this:
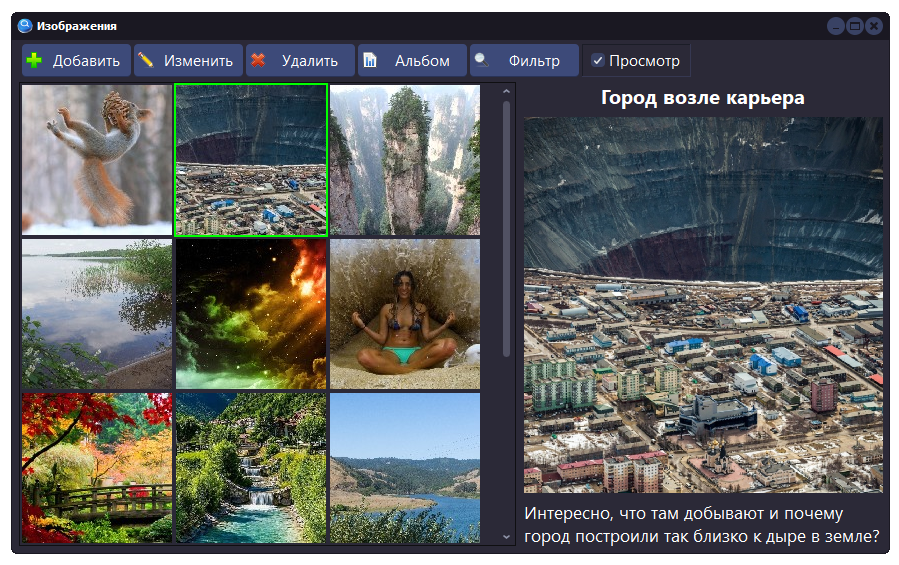
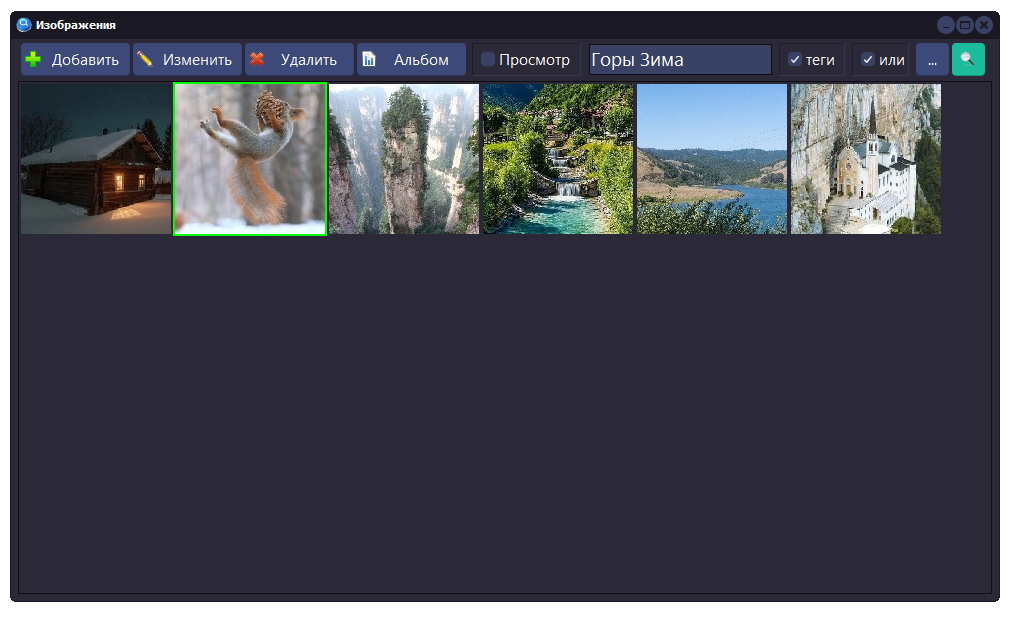
Display form
The form has a thumbnail display panel (1) and a preview panel (2). In addition to the usual database editing buttons, the toolbar has a checkbox for controlling the visibility of the preview panel (3) and an invisible btnSearch button, the click handler of which builds an image gallery. On the preview panel, in addition to the image itself, there are a couple of labels for displaying the title (5) and description (6).
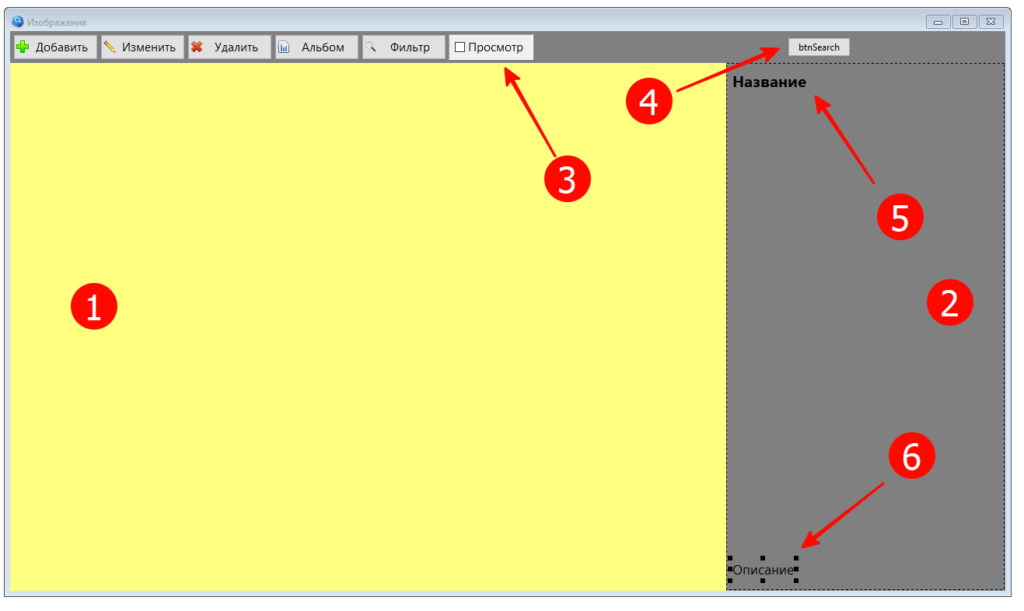
The checkbox has been styled like a button using a panel. This decision is due to the sad fact that standard buttons (TdbButton) do not have the ability to set the Down property. Perhaps in the future we will implement the toolbar using the TToolbar component, but for now, in order not to overly complicate the program code, we will restrict ourselves to a checkbox on the panel.
Using a button called btnSeach is a nod to a standard that we might also need in the future.
In order for the blank form to acquire the necessary conditions (add a splitter to control the size of the preview panel, make the size of the label responsible for the description of the photo adaptive), you need to “finish” it using a script.
procedure InitForm;
var
tmpSplitter:TSplitter;
begin
frmImage.panToolbar.Align := alTop;
frmImage.panImagePreview.Align := alRight;
frmImage.panPreview.Align := alClient;
// add preview area separator
tmpSplitter := TSplitter.Create(frmImage);
tmpSplitter.Name := 'splMain';
tmpSplitter.Parent := frmImage;
tmpSplitter.Left := frmImage.panImagePreview.Left - 1;
tmpSplitter.Align := alRight;
tmpSplitter.Width := 7;
// make adaptive sizes of the label with the description of the image
frmImage.labName.align := alTop;
frmImage.labDescription.align := alBottom;
frmImage.imgPreview.align := alClient;
// work out hiding the panel
frmImage_chbShowPreview_OnClick( frmImage.chbShowPreview );
end;Code language: Delphi (delphi)Building a gallery
A simple database query is used to build the data. In the future, this query will become more complex to filter data according to the specified criteria.
procedure frmImage_btnSearch_OnClick (Sender: TObject; var Cancel: boolean);
var
  tmpSQL: string;
  tmpDataSet: TDataSet;
  tmpTop: integer;
  tmpLeft: integer;
  tmpImage:TdbImage;
  tmpScrollBox: TScrollBox;
begin
  Control_ClearChild( frmImage.panPreview );
  // for vertical scrolling, add a scroll area
  tmpScrollBox := TScrollBox.Create(frmImage);
  tmpScrollBox.Parent := frmImage.panPreview;
  tmpScrollBox.Align := alClient;
  tmpScrollBox.Name := 'scbPreview';
  //
  frmImage.panPreview.Tag := 0; // ID selected item
  tmpTop := 0;
  tmpLeft := 0;
  // build preview images on palen
  tmpSQL := 'SELECT id, name, description FROM image';
  SQLQuery(tmpSQL,tmpDataSet);
  try
    while not tmpDataSet.EOF do
    begin
      // add image
      tmpImage := TdbImage.Create(frmImage);
      tmpImage.Parent := tmpScrollBox;
      tmpImage.Top := tmpTop + 2;
      tmpImage.Left := tmpLeft + 2;
      tmpImage.Width := 150;
      tmpImage.Height := 150;
      tmpImage.Proportional := False;
      tmpImage.Stretch := False;
      // assign event handlers on buttons
      AssignEvents(tmpImage);
      tmpImage.dbOnClick := 'PreviewImage_OnClick';
      tmpImage.dbOnDoubleClick := 'PreviewImage_OnDoubleClick';
      // use some image properties to store data
      tmpImage.Tag := tmpDataSet.FieldByName('id').asInteger;
      tmpImage.TagString := tmpDataSet.FieldByName('name').asString;
      tmpImage.Hint := tmpDataSet.FieldByName('description').asString;
      // loading image from file storage
      ImageEdit_LoadImageFromBase( tmpImage, tmpDataSet.FieldByName('id').asInteger, PI_SMALL, TM_IMAGE);
      tmpDataSet.Next;
      // calculate the next position for the image
      tmpLeft := tmpLeft + 154; // grid step
      // if the image goes beyond the width of the panel + the width of the scroll, then
      if frmImage.panPreview.Width < tmpLeft + 154 + 20 then
      begin // go to next row
        tmpLeft := 0;
        tmpTop := tmpTop + 154;
      end;
    end;
  except
    tmpDataSet.Free;
  end;
end;Code language: Delphi (delphi)
This procedure adds handlers for click and double click on the image. Please note that instead of the onDoubleClick property (which for some reason is not available in scripts), the similar dbonDoubleClick property is used to set the handler.
Attention! When assigning handlers through the properties of the db* be sure to use the AssignEvents() procedure.
Single click is used to select the image (display the frame and load the image data in the preview panel), and double click is used to edit the image.
To load an image from disk, the ImageEdit_LoadImageFromBase() procedure is called, which is passed as a parameter the component to load, the entry id, and additional parameters, which we will discuss later. This is due to the fact that it is necessary to consider a set of scripts that provide the creation of thumbnails.
Responsive Size
When changing the panel width, the thumbnails are moved so that they take up the full width of the scroll area. If the elements do not fit in the viewport, a vertical scroll bar automatically appears.
procedure frmImage_panPreview_OnResize (Sender: TObject);
// change of size
var
  i: integer;
  tmpImage:TdbImage;
  tmpFrame:TShape;
  C: TControl;
  tmpPanel: TdbPanel;
  tmpTop: integer;
  tmpLeft: integer;
  tmpForm:TAForm;
  tmpScrollBox: TScrollBox;
begin
  CForm(Sender,tmpForm);
  tmpPanel := TdbPanel(Sender);
  tmpTop := 0;
  tmpLeft := 0;
  FindC(tmpForm,'scbPreview',tmpScrollBox,False);
  // processing is needed only for the filled panel
  if tmpScrollBox <> nil then
  begin
    // move images
    for i := tmpScrollBox.ControlCount - 1 downto 0 do
    begin
      C := tmpScrollBox.Controls[i];
      if C is TdbImage then
      begin
        c.Top := tmpTop + 2;
        c.Left := tmpLeft + 2;
        tmpLeft := tmpLeft + 154;
        if tmpPanel.Width < tmpLeft + 154 + 20 then
        begin
          tmpLeft := 0;
          tmpTop := tmpTop + 154;
        end;
      end;
    end;
    // move frame if then exists
    FindC(tmpForm,'shpSelector',tmpFrame,False);
    if tmpFrame <> nil then
    begin
      tmpImage := TdbImage(frmImage.panPreview.Tag);
      tmpFrame.Top := tmpImage.Top - 2;
      tmpFrame.Left := tmpImage.Left - 2;
    end;
  end;
end;Code language: Delphi (delphi)
Thumbnail Editor
A thumbnail image of the original can be used for various purposes. For example, to display in a photo album gallery or as an employee’s avatar in a personnel management program, to display in a family tree, and so on.
Key properties of the TdbImage component
The TdbImage component is inherited from the standard TImage component, which can “scale” the image loaded into it, reducing or stretching it to fit the canvas. At the same time, anti-aliasing algorithms are used to make the picture look natural. What properties control this process?
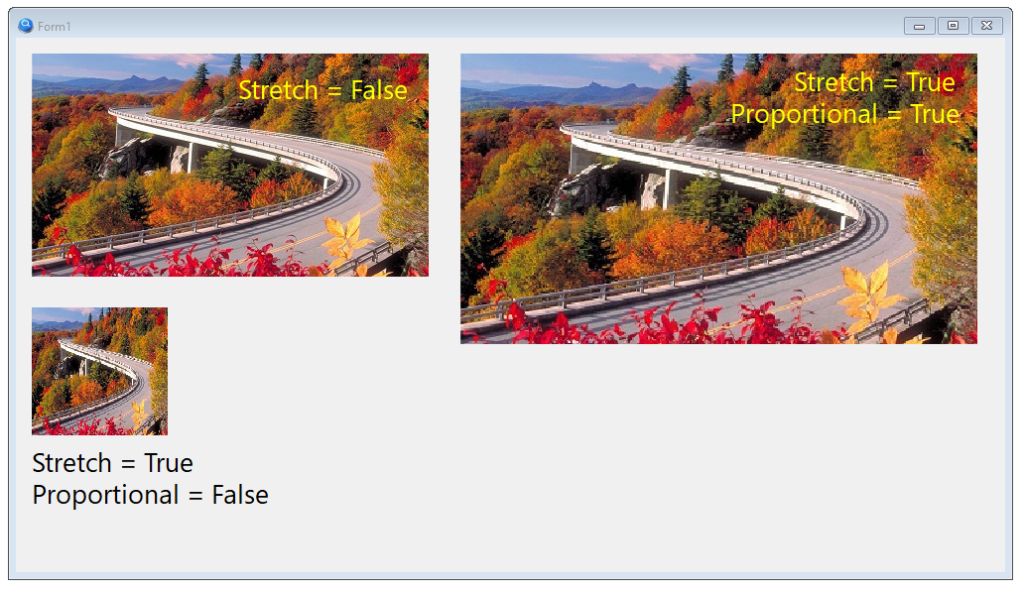
Stretch
The stretch property allows you to stretch the image, making it larger or smaller than the original.
- False – the image is displayed without scaling
- True – the image is stretched to the full size of the component; however, it can be increased or decreased.

Please note that the image was distorted when scaling, because when resizing, the proportion was violated: the ratio of the width and height of the image. In some cases, this is not critical (for example, when stretching a monochrome image or a gradient), but for photos and drawings, you need to maintain proportions. The Proportional property is responsible for this, which complements the Stretch property.
Proportional
False – proportions are not preserved, the image is stretched to fit the component
True – proportions are preserved
Center
This property allows you to center the image
False – the image is displayed from the upper left corner of the component
True – the image is displayed in the center of the component
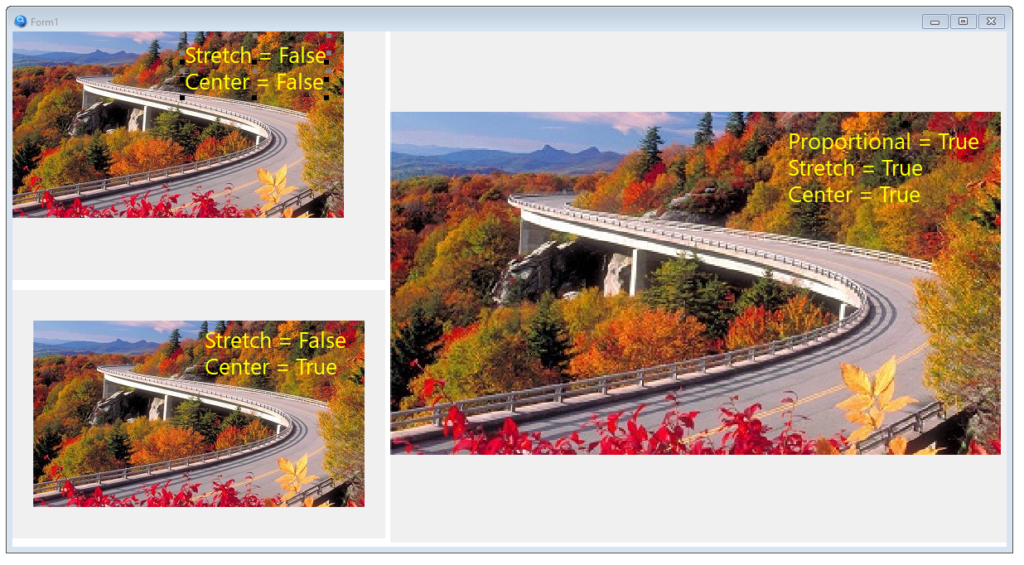
Algorithm
To get the thumbnail, we need two TdbImage components. The first component will contain the original image. The second component is for the thumbnail. Both components will have their properties set to scale the image while maintaining aspect ratio: Stretch = True, Proportional = True and Center = True.
To get a copy of the image, use the canvas’s CopyRect() method. It copies to the canvas an image that is on another canvas. To get focus, the TdbImage components must be placed on the panels, and the canvas of the parent panel should be used as the copy source. The explanation for this is simple: in order for the image loaded in the TdbImage component to become visible, it is drawn on the canvas of the parent component, in our case, the panel. And it is drawn taking into account the scaling properties described above. And the TdbImage canvas contains the original image.
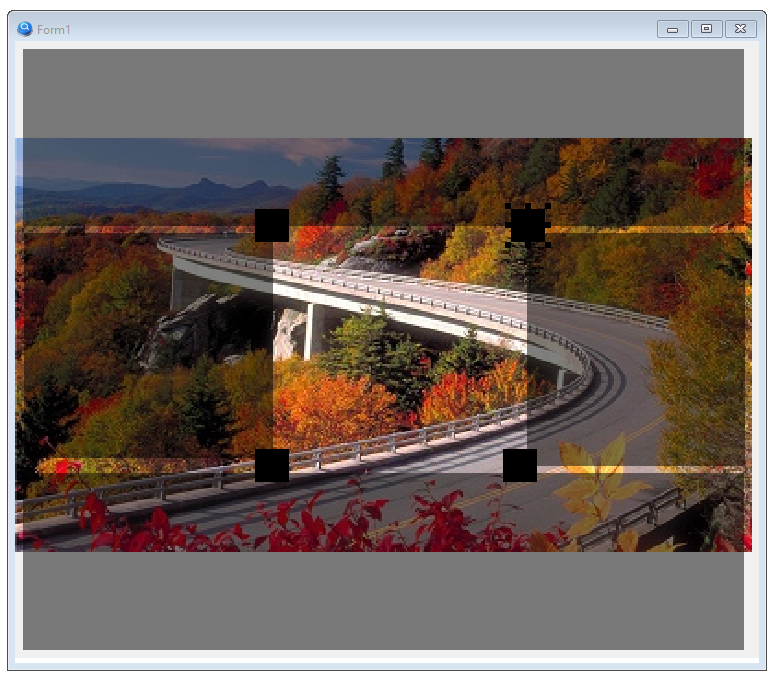
It is also necessary to somehow define the copy area, it is desirable that the mechanism be intuitive. For example, shade the image and make the copy area transparent by providing it with “helpers” – small squares for dragging with the mouse, with which you can change the size of the transparent “window”.
For shading, you will have to use 4 images loaded with a translucent png image, and for helpers, you will need four opaque black marks. We will also need another “image without an image” – a completely transparent image, which we will drag across the screen to select the copy area, and all other elements (translucent curtains, helpers) will move after it, creating the illusion of a transparent “hole”.
For a tool to be universal, all its settings must be described by constants. In addition, it must be able to create several thumbnails of different sizes at once from one given image.
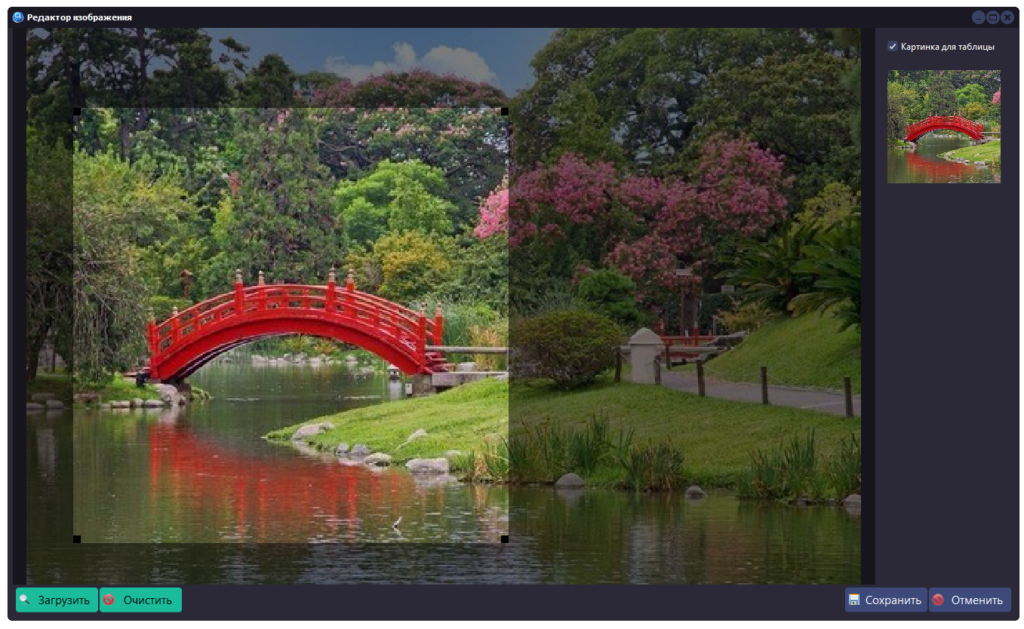
Implementation
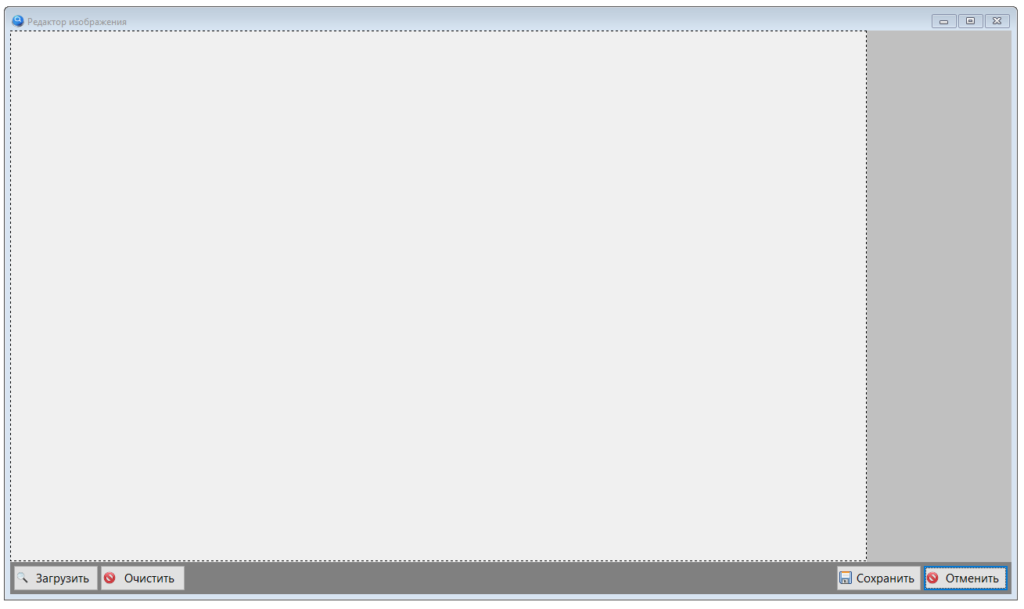
We will need a form on which we will place the key elements: the source image panel, the thumbnail panel and auxiliary buttons to control the process. All other elements will be created by the program, the scripts of which we will place in a separate module. This is done so that the thumbnail editor can be easily integrated into any project created on the My Visual Database platform.
Since My Visual Database does not have the ability to create custom classes, you will have to create a “virtual class” – a script library that provides the required functionality for an instance of a component of an accessible class.
Within this article, it is not possible to comment on all class methods, so I will only talk about the key ones.
TImageEdit
Actually speaking, the image editor into which the image will be loaded. Methods for saving an image, methods for manipulating curtains and helpers to control the copy area will also be implemented there.
Virtual class methods:
- ImageEdit_GetFileExt() – file extension being edited
- ImageEdit_GetImageDir() – get image path by type –
- ImageEdit_AjustHelpers() – set helpers by frame
- ImageEdit_Create() – Create an image editor
- ImageEdit_CreatePreviews() – Update thumbnails
- ImageEdit_Frame_OnMouseDown() – Start moving
- ImageEdit_Frame_OnMouseMove() – Move selector frame
- ImageEdit_Frame_OnMouseUp() – stop moving
- ImageEdit_GetPhoto() – remove image from canvas at coordinates specified by frame
- ImageEdit_Helper_OnMouseDown() – start moving helper
- ImageEdit_Helper_OnMouseMove() – move helpers
- ImageEdit_Helper_OnMouseUp() – end move helper
- ImageEdit_Init() – set edit mode
- ImageEdit_LoadImage() – load image for editing
- ImageEdit_LoadImageFromBase() – load image from server
- ImageEdit_PhotoPanel_OnResize() – panel resize – frame adjustment
- ImageEdit_Reset() – reset to original state
- ImageEdit_RestoreImages() – download photos from file server
- ImageEdit_SaveImages( ) – save photos on file server
- ImageEdit_SetFrame() – set helpers and set screen for photo editing
- ImageEdit_SetFrameDef() – reset to default state
- ImageEdit_SetTargetImage () – setting the target image
Images are stored in folders whose names are the same as the names of the tables, and the file name consists of the record ID and extension. For original files, the original extension is retained, for thumbnail files, the jpg extension.
procedure ImageEdit_LoadImageFromBase(AImage: TdbImage; AID: integer; APhotoType: integer; AImageType: integer);
// load image from base
// if the file exists, then load it; if not, then insert the default image
// AImage - where to download
// AID - Image ID
// APhotoType - type of image size
// AImageType - image type
var
  tmpFileName: string;
  tmpFolder: string;
  tmpFileExt: string;
begin
  tmpFolder := ImageEdit_GetImageDir(AImageType);
  // the original file has an unknown extension, so it needs to be pulled out by a search
  if APhotoType = IE_FT_ORIGINAL then
  begin
    // here you need to do a type check, but in our project, original pictures are stored only in photos
    tmpFileExt := SQLExecute('SELECT FileExt FROM image WHERE id ='+IntToStr(AID));
    tmpFileName := tmpFolder + IntToStr(AID) + tmpFileExt;
  end
  else // for the rest, the size is included in the name, the file format is jpg
    tmpFileName := tmpFolder + IntToStr(AID) + '_' + IntToStr(APhotoType) + '.jpg';
  // if the file exists, then load it
  if FileExists(tmpFileName) then
    AImage.Picture.LoadFromFile(tmpFileName)
  else // if not, then insert the default image
    SetImage(AImage, IE_IMG_DEFAULT);
end;

procedure ImageEdit_SaveImages(AImageEdit: TdbImage;);
// saving photos on a file server
var
  tmpTIPanel: TdbPanel;
  tmpForm: TAForm;
  tmpName: string;
  tmpFileName: string;
  tmpID: Integer;
begin
  tmpID := AImageEdit.Tag;
  CForm(AImageEdit, tmpForm);
  tmpName := DeleteClassName(AImageEdit.Name);
  FindC(tmpForm, T_TARGET_IMAGE_PANEL + tmpName, tmpTIPanel);
  tmpFileName := tmpTIPanel.TagString + inttostr(tmpID) + AImageEdit.TagString;
  SaveImageToFile(AImageEdit, tmpFileName, True);
  // if the picture is empty, then the file is not saved, otherwise we save the rest
  if FileExists(tmpFileName) then
  begin
    TargetImagePanel_SaveImages(tmpTIPanel, tmpID);
  end;
end;Code language: PHP (php)
TTargetImage
A module for getting a thumbnail. Accepts images from TImageEdit, works with file storage (saves and loads thumbnails in jpg format).
Virtual class methods:
- TargetImage_Checker_OnClick() – click on the header checker
- TargetImage_Create() – create a panel to display / save the image of the desired size
- TargetImage_Reset() – reset the image to default< /li>
- TargetImage_RestoreImage() – load image
- TargetImage_SaveImage() – save image
The image is saved in two steps. First, we prepare the image: we form the file name and remove the frame, if there was one.
procedure TargetImage_SaveImage(APanel: TdbPanel; AID: integer);
// save image
var
  tmpForm: TAForm;
  tmpName: string;
  tmpImage: TdbImage;
  tmpFrame: TdbImage;
  tmpTIPanel: TdbPanel;
  tmpFileName: string;
begin
  tmpTIPanel := TdbPanel(APanel.Parent);
  tmpName := DeleteClassName(DeleteSuffix(APanel.Name));
  CForm(APanel, tmpForm);
  FindC(tmpForm, T_IMAGE + tmpName, tmpImage);
  FindC(tmpForm, T_IMAGE + tmpName + SX_FRAME, tmpFrame, False);
  // collect the file name: folder + ID + extension
  tmpFileName := tmpTIPanel.TagString + inttostr(AID) + APanel.TagString;
  // if there is a frame, then remove it
  if tmpFrame <> nil then
  begin
    tmpFrame.Visible := False;
    Application.ProcessMessages;
  end;
  SaveImageToFile(tmpImage, tmpFileName);
  // then return the frame
  if tmpFrame <> nil then
    tmpFrame.Visible := True;
end;Code language: PHP (php)
Then we write the image to a file.
procedure SaveImageToFile(AImage: TdbImage; AFileName: string; AOriginalSize: boolean = False);
// saving an image from an image to a JPG file
// the picture must be the same size on the panel as the image is taken from the canvas of the panel.

var
  tmpBuffer: TBitMap;
  tmpJPG: TJPEGImage;
  tmpPan: TdbPanel;
begin
  if AOriginalSize then // no scaling, original resolution
    AImage.Picture.SaveToFile(AFileName)
  else // with scaling, in the size of the visible representation
  begin
    tmpBuffer := TBitMap.Create;
    tmpJPG := TJPEGImage.Create;
    tmpPan := TdbPanel(AImage.Parent); // make sure the panel exists
    tmpBuffer.Width := AImage.Width;
    tmpBuffer.Height := AImage.Height;
    tmpBuffer.Canvas.CopyRect(0, 0, tmpBuffer.Width, tmpBuffer.Height, tmpPan.Canvas, 0, 0, tmpBuffer.Width,
      tmpBuffer.Height);
    tmpJPG.Assign(tmpBuffer);
    tmpJPG.SaveToFile(AFileName);
    tmpJPG.Free;
    tmpBuffer.Free;
  end;
end;Code language: Delphi (delphi)
TTargetImagePanel
A panel for placing modules for obtaining thumbnails. Adapter – container. Link between TImageEdit and TTatgetImage set.
Class methods
- TargetImagePanel_Clear() – clear the panel from vignettes
- TargetImagePanel_Reset() – reset all images on the panel to their original state
- TargetImagePanel_RestoreImages() – restore images from the database
- TargetImagePanel_SaveImages() – saving images to the database
- TargetImagePanel_SetMode() – setting the operation mode – adding the necessary components to the target image panel
All methods, except for the last one, operate on the list of elements of the TTargetImage by passing it the appropriate command. And the TargetImagePanel_SetMode() method manages the list itself: it removes and creates the necessary elements on the panel.
procedure TargetImagePanel_SetMode(APanel: TdbPanel; AMode: integer);
// set the mode of operation - add the desired components to the panel of target images
var
  tmpImageEditor: TdbImage;
  tmpForm: TAForm;
  tmpName: string;
  tmpTIList: array of string;
  i: integer;
  tmpTIType: integer;
  tmpMaxWidth: integer;
  tmpParent: TWinControl;
  tmpPanel: TdbPanel;
begin
  tmpMaxWidth := 0;
  tmpName := DeleteClassName(DeleteSuffix(APanel.Name));
  CForm(APanel, tmpForm);
  FindC(tmpForm, T_IMAGE_EDIT + tmpName, tmpImageEditor);
  // if the mode is the same as the current one, we do not change the composition of the vignettes, we only reset the images to their original ones
  if APanel.Tag <> AMode then
  begin
    if AMode > (Length(ie_List) - 1) then
    begin
      RaiseException('TargetImagePanel_SetMode - mode not supported: '+IntToStr(AMode) );
      Exit;
    end;
    // remove all vignettes
    TargetImagePanel_Clear(APanel);
    // setup folder
    APanel.TagString := ImageEdit_GetImageDir(AMode);
    // add vignettes
    // get format list
    tmpTIList := SplitString( ie_List[ AMode ] ,',' );
    for i:=0 to Length(tmpTIList) - 1 do
    begin
      tmpTIType := StrToInt( tmpTIList[i] );
      // add thumbnail to panel
      TargetImage_Create('TI'+IntToStr( tmpTIType ), ie_TICaption[tmpTIType], tmpImageEditor, APanel, ie_TIWidth[tmpTIType], ie_TIHeight[tmpTIType] );
      if ie_TIWidth[tmpTIType] > tmpMaxWidth then
      tmpMaxWidth := ie_TIWidth[tmpTIType];
    end;
    // remember the current mode here
    APanel.Tag := AMode;
  end;
  // set thumbnail bar width
  // условность: редактор и панель миниатюр должны располагаться на одном родительском компоненте
  tmpParent := TWinControl( APanel.Parent );
  APanel.Width := tmpMaxWidth + IE_TI_MARGIN * 2;
  APanel.Left := tmpParent.Width - APanel.Width;
  tmpPanel := TdbPanel( tmpImageEditor.Parent );
  tmpPanel.Width := tmpParent.Width - APanel.Width;
  TargetImagePanel_Reset(APanel);
end;Code language: Delphi (delphi)
Because the initialization data is stored in arrays, the TargetImagePanel_SetMode procedure does not have to be rewritten each time the thumbnail set or editing modes change.
Init parameters
All constants and variables of the editor are moved to a separate module IEConstVar.pas:
// Constants and variables

const
  // Image editor options
  IE_HELPER_SIZE = 10; // helper size
  IE_HELPER_COLOR = clBlack; // helper color
  IE_IMG_TRANSLUCENT = 'Black50'; // component name with translucent image, 50% black
  IE_IMG_DEFAULT = 'DefImage'; // default picture
  // миниатюра
  IE_TI_CHECKBOX_SIZE = 24; // active thumbnail selection checker size
  IE_TI_MARGIN = 16; // indent vertical
  IE_TI_CHECKER_NAME = 'PhotoEditMode_'; // element name with checker
  //
  // to initialize arrays
  IE_TI_COUNT = 2; // number of thumbnail formats
  IE_COUNT = 3; // number of editing formats
  //
  // to communicate with the main application
  //
  // image types (editing formats)
  IE_IT_UNKNOW = -1; // initial state
  IE_IT_IMAGE = 0; // pictures/photos
  IE_IT_ALBUM = 1; // album covers
  IE_IT_PAGE = 2; // album page preview
  // what to upload - thumbnail formats
  IE_FT_ORIGINAL = -1; // original image
  IE_FT_SMALL = 0; // small picture
  IE_FT_MIDDLE = 1; // bigger picture

var
  ie_MovedObject: TObject; // moveable object
  ie_pX: integer;
  ie_pY: integer;
  // thumbnail formats
  ie_TIWidth: array of integer;
  ie_TIHeight: array of integer;
  ie_TICaption: array of string;
  // editing formats
  ie_Tables: array of string; // storage table
  ie_List: array of string; // list of thumbnails, numbers separated by commas

begin
  // initialization
  //
  SetLength(ie_TIWidth, IE_TI_COUNT);
  SetLength(ie_TIHeight, IE_TI_COUNT);
  SetLength(ie_TICaption, IE_TI_COUNT);
  //
  ie_TICaption[0] := 'Table Thumbnail';
  ie_TIWidth[0] := 150;
  ie_TIHeight[0] := 150;
  //
  ie_TICaption[1] := 'Album page';
  ie_TIWidth[1] := 250;
  ie_TIHeight[1] := 250;
  //
  // editing formats
  SetLength(ie_Tables, IE_COUNT);
  SetLength(ie_List, IE_COUNT);
  //
  ie_Tables[0] := 'Image';
  ie_List[0] := '0';
  //
  ie_Tables[1] := 'Album';
  ie_List[1] := '1';
  //
  ie_Tables[2] := 'Page';
  ie_List[2] := '1';

end.Code language: PHP (php)
Search by tags
Search performance depends on the algorithms used. Each image has a title, description, and a list of tags in the database. Search by text title and description is the easiest to implement. But it is also the slowest, since the LIKE condition is usually used to search, with the help of which a text fragment is found. An alternative search option, which is successfully used in many social networks, is searching by tags – keywords associated with the data you are looking for.
Data structure
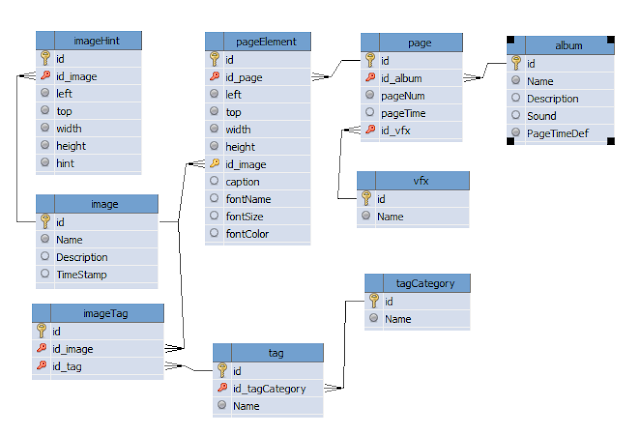
To organize the search by tags, the necessary table structure was created:
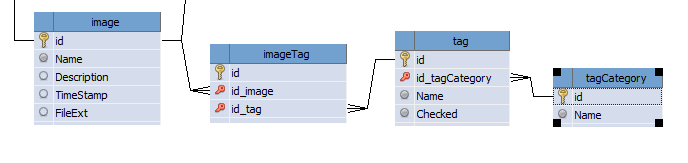
Images are associated with tags by a many-to-many relationship (imageTag). The tag.Checked field is used to filter by tags, which works well for a single-user application. An additional directory of tag categories will allow you to put things in order if there are a lot of tags.
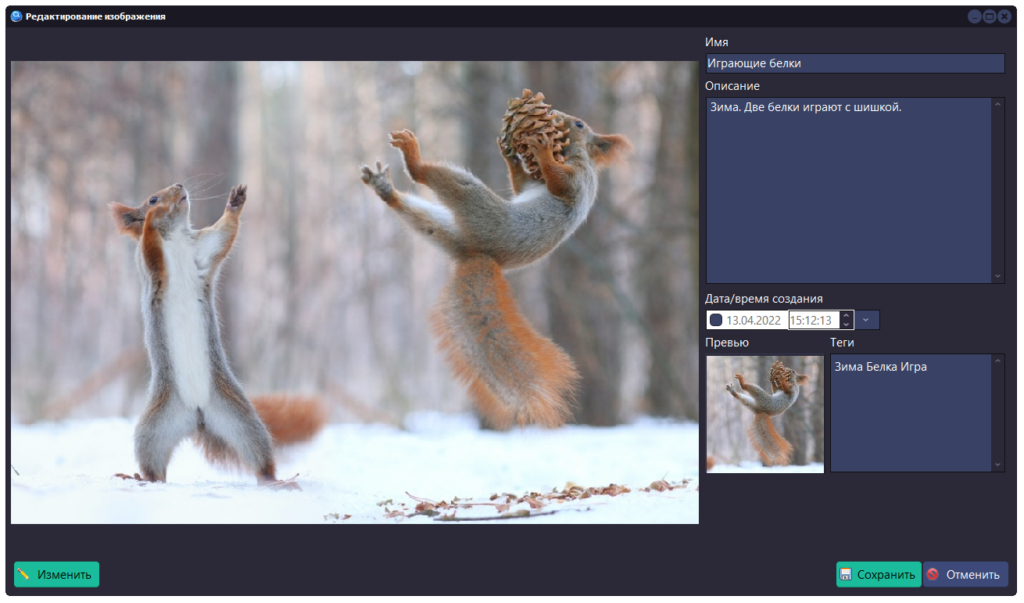
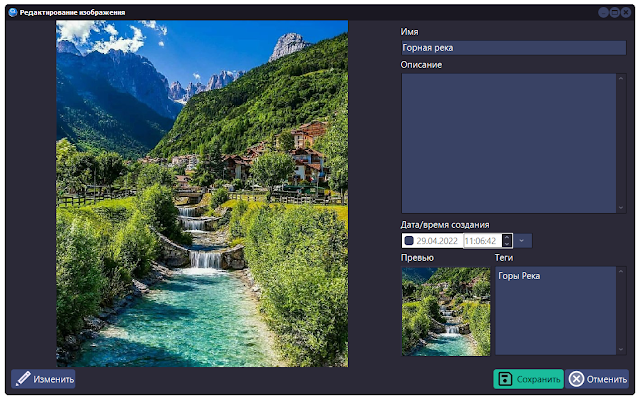
Editing image tags
According to the canons of My Visual Database, to edit the imageTag table, we would have to add a child table to the image editing form, in which the tags would be displayed. But that is not very convenient. Firstly, I am not a fan of child tables, and secondly, there will be difficulties in organizing the editing process of such a table, since it will be inconvenient to edit data in the table itself with a large number of tags. And thirdly, when adding an image, it often becomes necessary to add new tags. Therefore, we will use a text editor and a special script to edit image tags.
Two components are suitable for a text editor: TdbMemo and TdbRichEdit. However, I opted for the latter, since it is it that allows you to highlight individual words of the typed text with different colors.
According to the idea, the user types tags in the editor, and after he finishes editing, and this moment is determined by a pause in typing, the program automatically checks them. And if such a tag is not yet in the database, then it is highlighted in a different color so that the user immediately understands: either this is a new tag, or he made a mistake in writing. And when saving data for each new tag, an add form opens to select a tag category.
The first complication arose with the behavior of TdbRichEdit when using a style, namely, the background color of the document is not set according to the selected style. Moreover, this component does not have a property to control the background color of the editor. The solution was found: when the application starts, an HTML document is loaded into the component, in which the background color property is set for the body (but things are worse with the TdbDateTimePicker component – it glows with a bright white spot on the dark “TableDark” theme and most likely you will have to replace it with TdbEdit and a couple of scripts…).
The second difficulty, or rather the nuance of the behavior, was that the OnChange event occurred with any change in the editor (for comparison, in TdbMemo OnChange occurs only when the user manually changes the text), so I had to use the OnKeyUp event handler, in which 2 – second timer.
procedure frmImageEdit_redTags_OnKeyUp (Sender: TObject; var Key: Word; Shift, Alt, Ctrl: boolean);
// release key in tag editor
begin
  // if there is no timer yet, then create it
  if TagTimer = nil then
  begin
    TagTimer := TTimer.Create(frmImageEdit);
    TagTimer.OnTimer := @TagTimer_OnTimer;
  end;
  // restart timer for 2 seconds
  TagTimer.Enabled := False;
  TagTimer.Interval := 2000;
  TagTimer.Enabled := True;
  // set a sign that the data has been changed by the user
  frmImageEdit.redTags.Tag := 1;
end;Code language: Delphi (delphi)
And after the end of editing the tags, a handler is launched that checks the tags and highlights them if necessary.
procedure TagTimer_OnTimer (Sender: TObject);
// processing the list of tags in the tag editor
var
  i: integer;
  Tags: array of string;
  s: string;
  tmpTag: string;
  tmpETag: string;
begin
  TagTimer.Enabled := False; // stop the timer
  s := frmImageEdit.redTags.Text; // get tag data
  frmImageEdit.redTags.Clear; // clear editor
  // replace commas with spaces, remove newlines and double spaces
  s := ReplaceStr(s,',',' ');
  s := ReplaceStr(s,chr(13),' ');
  s := ReplaceStr(s,'  ',' ');
  Tags := SplitString( s,' '); // get list of tags as string array
  for i := 0 to length(Tags) - 1 do
  begin
    tmpTag := Trim(Tags[i]); // just in case, so that only the text remains
    if (tmpTag <> '') then
    begin
      // looking for a tag in the database
      tmpETag := VarToStr( SQLExecute('SELECT name FROM tag WHERE upper( name ) = upper("'+tmpTag+'")') );
      // if not found then
      if tmpETag = '' then
      begin // insert the tag in the user's spelling, but with a capital first letter, in yellow
        tmpTag := UpperCase(copy(tmpTag,1,1)) + copy(tmpTag,2,length(tmpTag)-1);
        frmImageEdit.redTags.InsertTextEx(tmpTag,$00FFFF,11,0,'Segoe UI')
      end // if found, then insert in writing from the base, in white
      else
        frmImageEdit.redTags.InsertTextEx(tmpETag,$FFFFFF,11,0,'Segoe UI');
     // add space
     frmImageEdit.redTags.InsertTextEx(' ',$FFFFFF,11,0,'Segoe UI');
    end;
  end;
end;Code language: Delphi (delphi)
You will also need a couple more scripts: to save tags to the database
procedure frmImageEdit_btnSave_OnAfterClick (Sender: TObject);
// after successful save
var
  tmpSQL: string;
  s: string;
  tmpIDTag: string;
  tmpIDImage: string;
  Tags: array of string;
  i: integer;
begin
  if frmImageEdit.redTags.Tag = 1 then
  begin
    tmpIDImage := IntToStr(frmImageEdit.btnSave.dbGeneralTableId);
    // delete old
    tmpSQL := 'DELETE FROM imageTag WHERE id_image = '+tmpIDImage;
    SQLExecute(tmpSQL);
    // save new
    s := frmImageEdit.redTags.Text;
    s := ReplaceStr(s,',',' ');
    s := ReplaceStr(s,chr(13),' ');
    s := ReplaceStr(s,'  ',' ');
    Tags := SplitString(s,' ');
    for i := 0 to length(Tags) - 1 do
    begin
      s := Trim(Tags[i]);
      if (s <> '') then
      begin
        // use case insensitive search:
        tmpSQL := 'SELECT id FROM tag WHERE upper( name ) = upper("'+s+'")';
        // ID тега
        tmpIDTag := VarToStr( SQLExecute(tmpSQL) );
        // if there is no such tag in the database, then we suggest the user to add it
        if tmpIDTag = '' then
        begin
          // TODO: сделать опцию автоматического добавления, без участия пользователя
          // add new tag
          frmTagEdit.TagString := s;
          frmTagEdit.NewRecord('tag');
          tmpIDTag := VarToStr( SQLExecute('SELECT id FROM tag WHERE upper( name ) = upper("'+s+'")') );
        end;
        if tmpIDTag <> '' then
        begin
          tmpSQL := 'INSERT INTO imageTag (id_image,id_tag) VALUES ( '+tmpIDImage+',  '+tmpIDTag+') ';
          SQLExecute(tmpSQL);
        end;
      end;
    end;
  end;
end;Code language: Delphi (delphi)
…and to restore the appearance of tags from the database when opening the edit form: after all, the database for each image does not store tag texts, but links to them, which allows you to make selections with large data arrays quickly enough, as well as use various logical operations and relevant search.
procedure frmImageEdit_OnShow (Sender: TObject; Action: string);
// show form
var
  s: string;
  tmpSQL: string;
begin
  // load images from base
  ImageEdit_LoadImageFromBase( frmImageEdit.imgImage, frmImageEdit.btnSave.dbGeneralTableId, IE_FT_ORIGINAL, IE_IT_IMAGE);
  ImageEdit_LoadImageFromBase( frmImageEdit.imgPreview, frmImageEdit.btnSave.dbGeneralTableId, IE_FT_SMALL, IE_IT_IMAGE);
  if Action = 'NewRecord' then
  begin
    frmImageEdit.edtName.Text := 'New Image';
    frmImageEdit.redTags.InsertTextEx(' ',$FFFFFF,11,0,'Segoe UI');
  end
  else
  begin
    // create a list of tags
    tmpSQL := ' SELECT GROUP_CONCAT (tag.name,'' '') FROM imageTag LEFT JOIN tag ON tag.id = imageTag.id_tag WHERE imageTag.id_image = '+IntToStr(frmImageEdit.btnSave.dbGeneralTableId);
    s := VarToStr( SQLExecute(tmpSQL) );
    frmImageEdit.redTags.InsertTextEx(s,$FFFFFF,11,0,'Segoe UI');
  end;
  frmImageEdit.redTags.Tag := 0;
end;Code language: Delphi (delphi)
Search system
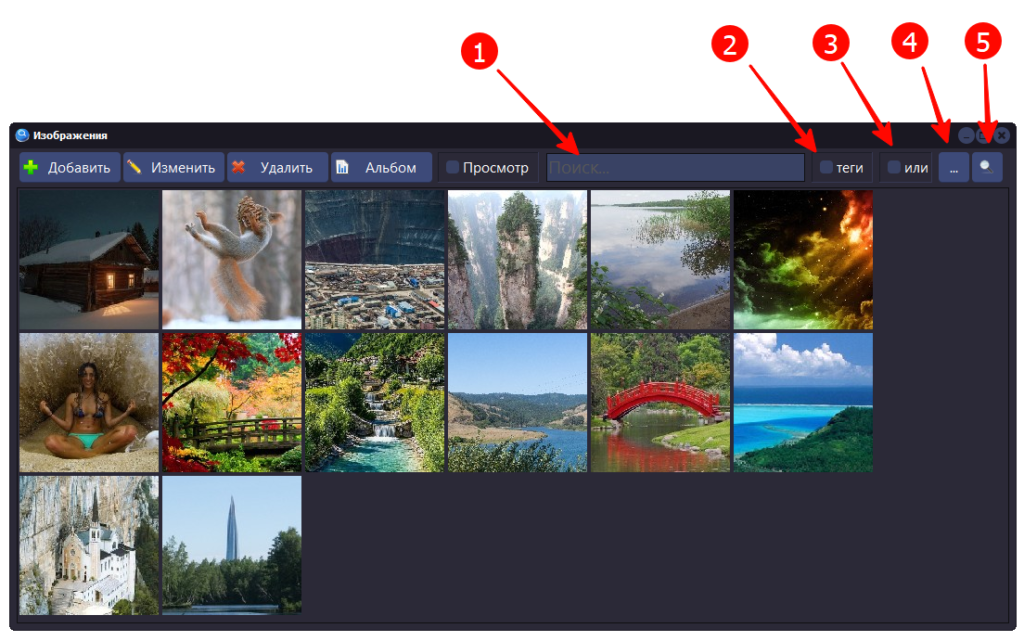
The search bar is located on the toolbar. It includes a text input field (1), a checker for enabling the search by tags mode (2), a checker for enabling the logical “OR” when searching by tags (3), a button for selecting tags from the directory (4) and, in fact, a search button (5).
procedure frmImage_btnSearch_OnClick (Sender: TObject; var Cancel: boolean);
// building a gallery
var
  tmpSQL: string;
  tmpDataSet: TDataSet;
  tmpTop: integer;
  tmpLeft: integer;
  tmpImage:TdbImage;
  tmpScrollBox: TScrollBox;
begin
  Control_ClearChild( frmImage.panPreview );
  // add scrollbar for vertical scrolling
  tmpScrollBox := TScrollBox.Create(frmImage);
  tmpScrollBox.Parent := frmImage.panPreview;
  tmpScrollBox.Align := alClient;
  tmpScrollBox.Name := 'scbPreview';
  //
  frmImage.panPreview.Tag := 0;
  tmpTop := 0;
  tmpLeft := 0;
  // building previews on the panel
  if frmImage.edtFilter.Text = '' then
    // all
    tmpSQL := 'SELECT id, name, description FROM image LIMIT 30'
  else
  if not frmImage.chbTag.Checked then
    // by name or by description by entry
    tmpSQL := 'SELECT id, name, description FROM image WHERE (name LIKE "%'+frmImage.edtFilter.Text+'%") OR (description LIKE "%'+frmImage.edtFilter.Text+'%") LIMIT 30'
  else
  if frmImage.chbOR.Checked then
  // "OR", sorted by relevance
    tmpSQL := ' SELECT id, name, description FROM ( SELECT count(image.id) as c, image.id, image.name, image.description FROM tag LEFT JOIN imageTag ON imageTag.id_tag = tag.id LEFT JOIN image ON image.id = imageTag.id_image WHERE tag.checked = 1 AND image.id IS NOT NULL GROUP BY image.id ORDER BY 1 DESC LIMIT 30 )  '
  else
    // strict match "AND"
    tmpSQL := 'SELECT id, name, description FROM ( SELECT count(image.id) as c, image.id, image.name, image.description FROM tag LEFT JOIN imageTag ON imageTag.id_tag = tag.id LEFT JOIN image ON image.id = imageTag.id_image WHERE tag.checked = 1 AND image.id IS NOT NULL GROUP BY image.id ) WHERE c = (SELECT count(*) FROM tag WHERE tag.checked = 1) LIMIT 30';
  SQLQuery(tmpSQL,tmpDataSet);
  try
    while not tmpDataSet.EOF do
    begin
      // add image
      tmpImage := TdbImage.Create(frmImage);
      tmpImage.Parent := tmpScrollBox;
      tmpImage.Top := tmpTop + 2;
      tmpImage.Left := tmpLeft + 2;
      tmpImage.Width := 150;
      tmpImage.Height := 150;
      tmpImage.Proportional := False;
      tmpImage.Stretch := False;
      // assign handlers to buttons
      AssignEvents(tmpImage);
      tmpImage.dbOnClick := 'frmImage_PreviewImage_OnClick';
      tmpImage.dbOnDoubleClick := 'frmImage_PreviewImage_OnDoubleClick';
      // use some image properties to store data
      tmpImage.Tag := tmpDataSet.FieldByName('id').asInteger;
      tmpImage.TagString := tmpDataSet.FieldByName('name').asString;
      tmpImage.Hint := tmpDataSet.FieldByName('description').asString;
      // loading image from file storage
      ImageEdit_LoadImageFromBase( tmpImage, tmpDataSet.FieldByName('id').asInteger, IE_FT_SMALL, IE_IT_IMAGE);
      tmpDataSet.Next;
      // calculate the next position for the image
      tmpLeft := tmpLeft + 154; // grid step
      // if the image goes beyond the width of the panel + the width of the scroll, then
      if frmImage.panPreview.Width < tmpLeft + 154 + 20 then
      begin // move to new row
        tmpLeft := 0;
        tmpTop := tmpTop + 154;
      end;
    end;
  finally
    tmpDataSet.Free;
  end;
end;Code language: Delphi (delphi)
If you type text in the search bar and click the “Search” button, then the data will be selected through an SQL query with text search by occurrence in the fields image.name and image.description.
When the “Tags” checker is activated, the text typed in the search bar is interpreted as a set of tags separated by a space or a comma. The result includes images that have all the specified tags.
If you activate the “Or” checker, the result will include images that have at least one of the searched tags. The images themselves will be sorted in order of relevance (most hits first).
When you click the “Select tags from the directory” button, the tag directory opens, which is also a custom filter.
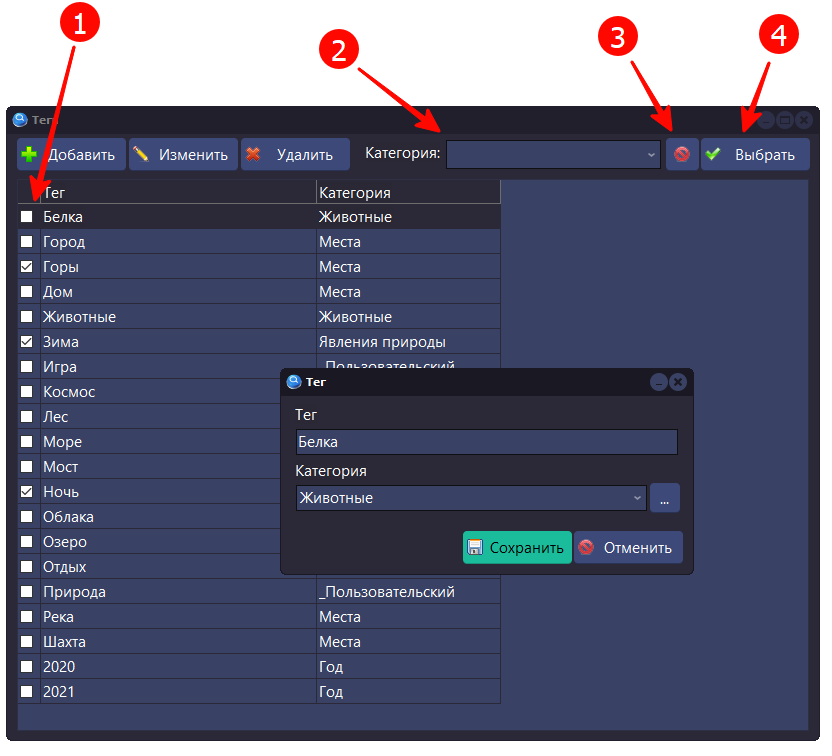
A column with checkers is used to select tags (1), while tags can be filtered by category (2). To reset all checkers, the “Clear selection” button (3) is provided. And to confirm the choice, the “Select” button (4), when pressed, the selected tags are transferred to the search filter.
The data selection request contains a fixed limit on the number of records, so that building the gallery takes a finite and relatively short time. In the future, it will be necessary to add a special “Show more” button to load the next batch of pictures. The request will be similar, but include the OFFSET command – an offset from the start of the selection.
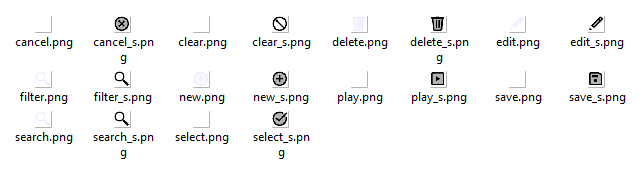
Pictures on buttons
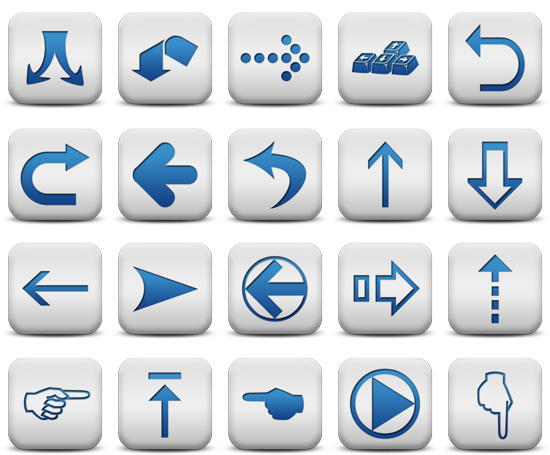
After some of the main functionality is implemented, you can take a break and think about improving the appearance of the program. For example, replace the standard images on the buttons with more modern ones that match the selected color scheme.
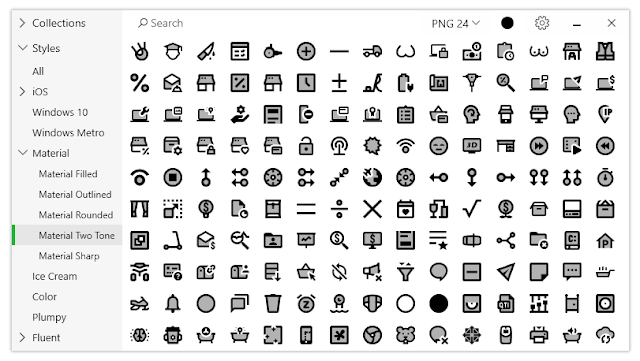
The task is solved in two stages: creating (search) images and loading them into the program. The first step I recommend using a handy and free tool: the Pichon for Windows Image Library, which can be found at https://icons8.com
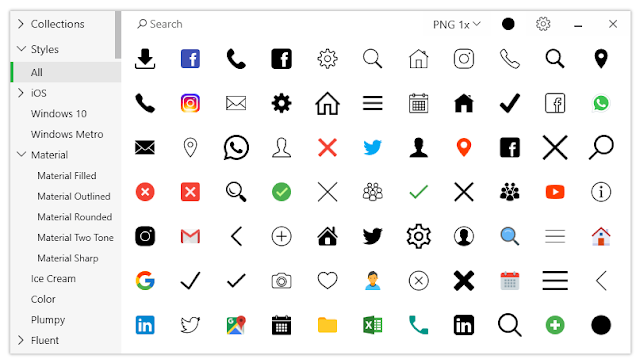
Since the buttons in the selected theme are displayed in two contrasting colors, we need two sets of images: lighter ones for a dark background and darker ones for a lighter one. Strictly speaking, the choice of color for images is determined by the style: I will use the color of the text with which the labels on the buttons are displayed.
For the TabletDark style, this is white and black. For these purposes, images are well suited for which you can set the color (Material), in particular Material Two Tone – these images, in addition to the main tone, contain halftones – translucent areas of images.
The images themselves can be stored in a special graphics.dll file, which is automatically generated and contains all the graphics data used in form design mode. This method is well described in the book Modern UI. But this time, the images will be loaded at the moment the application is launched from a special folder, which is more in line with the principles of styling the program. I note that the style of the final application depends on the presence and content of the style.vsf file, that is, by changing this file, you can change the style of the application without recompiling it. The same can be done with button images by simply replacing the files in the images folder.
Virtual Class Images
To implement all the functions of working with images, let’s create a virtual class and a set of scripts. The purpose of the class is to work with sets of images that will be loaded into the program at the time the application is launched.
The class is implemented through abstract methods (without creating an instance of the class), there are only four of them:
- Images_ButtonsAssign() – Assigning images to form buttons
- Images_Init() – Data initialization
- Images_Load() – Loading images
- Images_Set – Assign image indexes to the button by file name
Data is stored in global variables, in arrays of various types. If MVDB supported the full syntax of the Pascal language, then instead of this zoo we would use structured data (Record), but, as they say, what is, is.
const
  // folders are relative to the application folder
  IMAGES_DIR = '\Images\';   // the folder that contains the images

  IMAGES_SELECTED_SUFFIX = '_S'; // suffix in the name for the image of the selected button
  IMAGES_HOT_SUFFIX = '_H'; // suffix in the name for the button image on hover
  IMAGES_DISABLE_SUFFIX = '_D'; // suffix in the name for the disabled button image
  IMAGES_PRESSED_SUFFIX = '_P'; // suffix in the name for the image of the pressed button

  IMAGES_FORMAT_COUNT = 2; // how many formats are in the library
  // list of formats
  IMAGES_FORMAT_BUTTON = 0; //
  IMAGES_FORMAT_BIGBUTTON = 1; //
  //
  // button image upload models
  IMAGES_SIMPLE_MODEL = 1; // simple
  IMAGES_FULL_MODEL = 2; // full

var
  ImagesDir: array of string; // storage folders
  ImagesSize: array of integer; // image sizes
  ImagesList: array of TImageList; // image storage
  ImagesNames: array of TStringList; // uploaded image namesCode language: Delphi (delphi)
Data initialization is performed when the application starts. It includes setting up folders for uploading images and their size. The peculiarity of using the TImageList class for storing images is that it can store images of the same size. Therefore, each size will require separate storage.
procedure Images_Init;
// init data
var
  i: integer;
begin
  // init arrays
  SetLength(ImagesDir,IMAGES_FORMAT_COUNT);
  SetLength(ImagesSize,IMAGES_FORMAT_COUNT);
  SetLength(ImagesList,IMAGES_FORMAT_COUNT);
  SetLength(ImagesNames,IMAGES_FORMAT_COUNT);
  // project setup
  ImagesDir[IMAGES_FORMAT_BUTTON] := IMAGES_DIR + 'Buttons\';
  ImagesSize[IMAGES_FORMAT_BUTTON] := 32;
  ImagesDir[IMAGES_FORMAT_BIGBUTTON] := IMAGES_DIR + 'BigButtons\';
  ImagesSize[IMAGES_FORMAT_BIGBUTTON] := 48;
  // load data
  for i := 0 to IMAGES_FORMAT_COUNT-1 do
  begin
    ImagesNames[i] := TStringList.Create;
    ImagesList[i] := TImageList.Create(MainForm);
    Images_Load(i); // load image
  end;
  Images_ButtonsAssign( IMAGES_FORMAT_BUTTON,'','frmShow' );
  Images_ButtonsAssign( IMAGES_FORMAT_BIGBUTTON,'frmShow','' );
end;Code language: PHP (php)
Initialization includes not only setting arrays for a specific project, but also loading data from disk, as well as automatically assigning images to buttons.
procedure Images_Load( AIndex:integer  );
// loading pictures
// made by a procedure with parameters, since the application can have several image sizes,
// which should be stored in different lists; png images
var
  tmpList:TStringList;  // list of files in the folder with pictures
  tmpImageList:TImageList;
  tmpImageNames: TStringList;
  i:integer;
  tmpImageDir: string;
  s:string;
begin
  tmpImageDir := ExtractFilePath(Application.ExeName)+ImagesDir[AIndex];
  if DirectoryExists(tmpImageDir) then
  begin
    tmpImageList := ImagesList[AIndex];
    tmpImageNames := ImagesNames[AIndex];
    //
    tmpImageList.Masked:=false;
    tmpImageList.ColorDepth:=cd32bit;
    // размер картинок
    tmpImageList.Width := ImagesSize[AIndex];
    tmpImageList.Height := ImagesSize[AIndex];
    tmpList := TStringList.Create;
    try
      tmpList.Text := GetFilesList( tmpImageDir );
      for i := 0 to tmpList.Count - 1 do
      begin
        tmpImageList.AddPng( tmpList.strings[i] );
        s := UpperCase( ExtractFileName(tmpList.strings[i]) );
        s := copy(s,1,Length(s)-4);
        tmpImageNames.Add( s );
      end;
    finally
      tmpList.Free;
    end;
  end
  else
    RaiseException('Folder not found '+tmpImageDir);
end;Code language: Delphi (delphi)
Pictures must be in PNG format. Their names must follow certain rules: suffixes in the file names are used to designate images of various button states.
- _S(elected) – The selected button. The selected button is the button with the focus, the focus is on the button after pressing or using the Tab
- _H(ot) – Button with the cursor over it. On hover, if the button is available.
- _D(isabled) – Disabled button
- _P(ressed) – The pressed button. When pressed, after releasing the button becomes selected
The full model uses five images for one button. In the simplified model, there are only two.
Images are assigned according to certain rules: the button name must include a three-letter prefix (class name) and the button name. If there is a picture with the same name, then the image array is bound to this button and the corresponding indexes are assigned. The assignment goes through all forms, but you can set a white and black list of forms. Thus, the maximum universality of the code is achieved.
procedure Images_ButtonsAssign( AIndex: integer; AWhiteList: string; ABlackList:string );
// assigning images to buttons on forms
// AIndex - Image format
// AWhiteList - whitelist, modify only specified forms
// ABlackList - blacklist, exclude forms
var
  tmpForm: TAForm;
  tmpButton: TdbButton;
  tmpName: string;
  i: integer;
  j: integer;
  tmpByName: boolean;
  tmpFormList: string;
begin
  if AWhiteList <> '' then
  begin
    tmpByName := True;
    tmpFormList := ','+AWhiteList+',';
  end
  else
  begin
    tmpByName := False;
    tmpFormList := ','+ABlackList+',';
  end;
  for i := 0 to Screen.FormCount - 1 do
  begin
    tmpForm := TAForm(Screen.Forms[i]);
    if ( tmpByName and (pos( tmpForm.name, tmpFormList )>0) ) or ( not tmpByName and (pos( tmpForm.name, tmpFormList )=0) )  then
    for j:=0 to tmpForm.ComponentCount - 1 do
    begin
      if tmpForm.Components[j] is TdbButton then
      begin
        tmpButton := TdbButton(tmpForm.Components[j]);
        tmpName :=  DeleteClassName(tmpButton.Name);
        Images_Set( tmpButton, tmpName, AIndex, IMAGES_SIMPLE_MODEL );
      end;
    end;
  end;
end;Code language: Delphi (delphi)
The last method is assigning a picture by its name. It may be required not only when initializing the buttons, but also during the operation of the application in order to quickly change the images on the button.
procedure Images_Set( AButton:TdbButton; AImageName:string; AIndexOfSize:integer; AModel: integer );
// assign image index by file name
// AButton:TdbButton; - button
// AImageName:string; - image name
// AIndexOfSize:integer; - size index
// AModel: integer - model
var
  tmpImageIndex: integer;
  tmpImageSelectedIndex: integer;
  tmpImageHotIndex: integer;
  tmpImageDisableIndex: integer;
  tmpImagePressedIndex: integer;
begin
  AImageName := UpperCase(AImageName);
  if AImageName <> '' then
  begin
    // main image
    tmpImageIndex := ImagesNames[AIndexOfSize].IndexOf(AImageName);
    tmpImageSelectedIndex := ImagesNames[AIndexOfSize].IndexOf(AImageName+IMAGES_SELECTED_SUFFIX);
    tmpImageHotIndex := ImagesNames[AIndexOfSize].IndexOf(AImageName+IMAGES_HOT_SUFFIX);
    tmpImageDisableIndex := ImagesNames[AIndexOfSize].IndexOf(AImageName+IMAGES_DISABLE_SUFFIX);
    tmpImagePressedIndex := ImagesNames[AIndexOfSize].IndexOf(AImageName+IMAGES_PRESSED_SUFFIX);
    if tmpImageIndex >= 0 then
    begin
      AButton.Images := ImagesList[AIndexOfSize];
      AButton.ImageIndex := tmpImageIndex;
      case AModel of
      IMAGES_SIMPLE_MODEL: begin
        AButton.SelectedImageIndex := tmpImageSelectedIndex;
        AButton.HotImageIndex := tmpImageSelectedIndex;
        AButton.DisabledImageIndex := tmpImageIndex;
        AButton.PressedImageIndex := tmpImageSelectedIndex;
      end;
      IMAGES_FULL_MODEL: begin
        AButton.SelectedImageIndex := tmpImageSelectedIndex;
        AButton.HotImageIndex := tmpImageHotIndex;
        AButton.DisabledImageIndex := tmpImageDisableIndex;
        AButton.PressedImageIndex := tmpImagePressedIndex;
      end;
      end;
    end;
  end;
end;Code language: Delphi (delphi)
As a result, the application has got stylish pictures on the buttons:
By the way, I found an interesting project: https://tonfotos.com/
A program for sorting photos. Paid. But good. And promising. There are pros and cons. But there are more advantages))