
Theory is when everything is known, but nothing works. Practice is when everything works, but no one knows why. We combine theory and practice: nothing works… and no one knows why!
Albert Einstein
Automation My Visual Database
Typically, My Visual Database users do not need to write queries to retrieve the desired data from the database and display it. The entire construction mechanism is hidden, and the required request is generated automatically after the user configures the visual components.
Let’s consider, as an example, a simple table containing information about goods (item): name (name), article number (code) and price (price).

To display data from the item table, just specify in the table setup wizard the displayed data (2) and the data source (1) – the main parameters of the SELECT command:

As a result, an SQL query is automatically generated to obtain data:
SELECT 'item'.'code', 'item'.'name', 'item'.'price', 'item'.id
FROM itemCode language: SQL (Structured Query Language) (sql)The same thing happens when the user configures a dropdown list to display reference values on an edit form. The system determines the data source based on the key field connection (1) and filters the list of available fields to fill the FieldName property

As a result, a request is generated
SELECT 'doctype'.'name', 'doctype'.id
FROM doctypeCode language: SQL (Structured Query Language) (sql)
📝 In addition to the displayed fields, MVDB includes in service requests an id field hidden from the user’s eyes, which is used to implement the internal logic of the components. This field is created with a primary key and automatic value generation (ascending).
CREATE TABLE item (
    id           INTEGER PRIMARY KEY ASC AUTOINCREMENT,
    name         TEXT,
    code         TEXT,
    price        REAL
);Code language: SQL (Structured Query Language) (sql)
📝 The second feature of internal MVDB queries is that table and field names are wrapped in quotes, which allows you to protect the work from user errors, for example, in the case of using SQL service words as table and field names.
Setting up a connection to the database
When you launch an application configured to work with the SQLite DBMS, an automatic connection to the database file occurs. By default, this file is located next to the executable file. To connect to another file, you can use the standard menu item:

Then change the location type of the database file (1), select another existing file (2) and save the result (3).
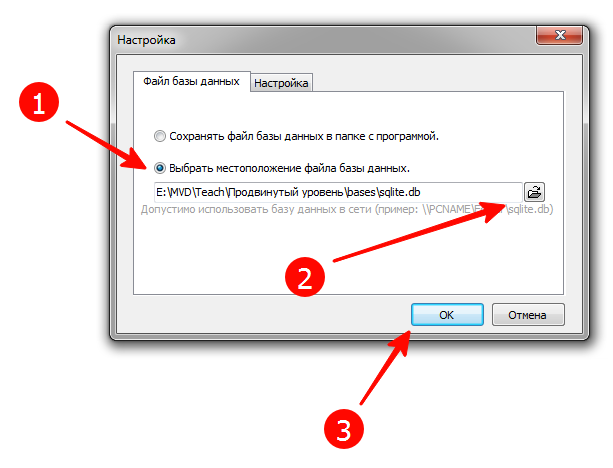
This information will be saved in the settings.ini file and will be used the next time the program is launched:
[Options]
DBMS=sqlite
server=E:\MVD\Teach\Продвинутый уровень\bases\sqlite.db
📝 It is possible to change the connection programmatically, but this will require the use of scripts.
Calculated fields
Calculated fields are needed in cases where it is necessary to display not the data itself from the primary table, but the result of some actions or data from related tables. Usually My Visual Database handles the task of retrieving data from related tables on its own, but there are situations when it cannot cope with this, and then you need to use calculated fields.
☝ A calculated field is not stored in the database, but allows you to display the necessary information using the My Visual Database visual components.
How do calculated fields work? My Visual Database inserts the SQL code you write into the SELECT query constructs it generates based on the table setup description. Let’s look at this with a simple example.
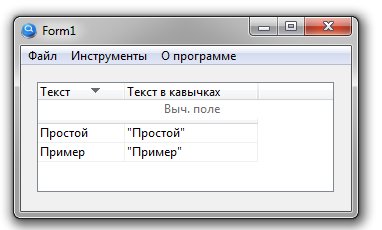
We have a table with one text field and one calculated field:

For a calculated field, add double quotes to the text:
To display the data, let’s create a table view:

As a result, My Visual Database will generate the following query:
SELECT DISTINCT
  "Test"."text" as "Test.text",
  ( '"' || test.text || '"' ) AS 'Test.q_text',
  "Test".id
FROM "Test"Code language: SQL (Structured Query Language) (sql)
which will be used to display the data in a table view:
☝ Calculated fields cannot be used in SQL queries; instead of names of calculated fields, it is necessary to insert constructs similar to those generated by My Visual Database:
<SQL-commands> AS <alias>Code language: HTML, XML (xml)To add a calculated field, on the “Database Tables” tab, find the desired table to which the field will be bound (binding is necessary for the visual components of My Visual Database to work: tables and drop-down lists). Then click the “New Field” button (1), and in the drop-down list select “Calculated Field” (2)

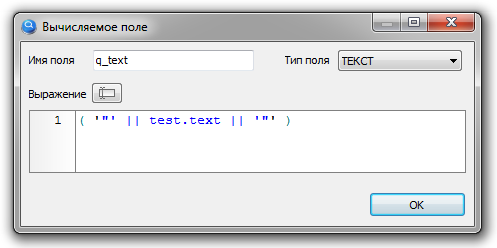
A designer window will open in which you need to enter the name of the field (1), select its type (2) and write part of the SQL query (3). This text will later be automatically inserted by the system into the main SQL query, after the SELECT keyword, in the “Data” section.
📝 For version 6.2. the MONEY type works the same as the RAL type – that is, without formatting into a currency format. For formatting, you must use scripts, the use of which will be discussed in the third part of the course.

After completing the input, save the result (4). There is also a button (5) with which you can add names of fields or functions to the text:

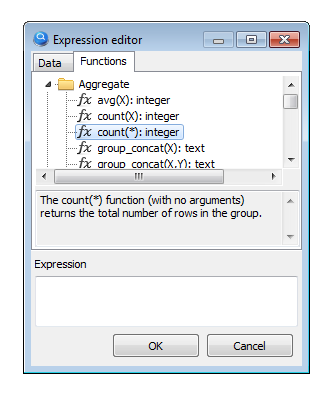
The functions will be discussed in more detail in a separate section.
☝ For MVDB version 6.2. Only SQLite function names are displayed.
To make it easier to work with a list of products when creating documents, it can be convenient to see both the article and the product code at the same time. Also, the article is often used to search for a product, which can be useful in the drop-down list.

To display both code and name in one field, add a calculated field with full name. To connect string values we use two vertical bars:
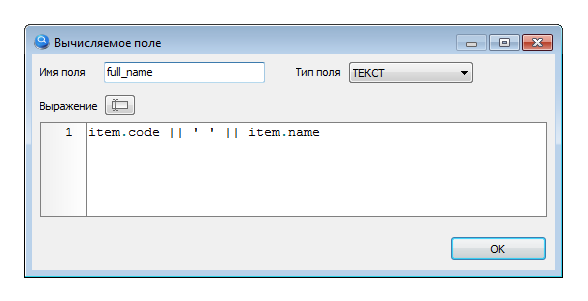
☝ Although SQL syntax allows you to write a field name without specifying a table, always write the full field name: <table name>.<field name>. This will avoid the error of ambiguous name definitions in the request text.
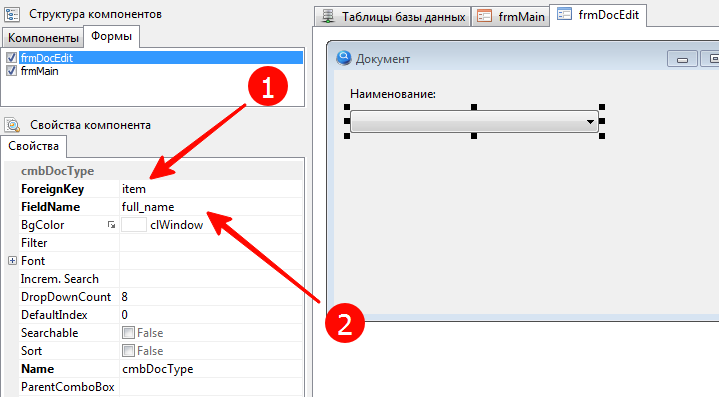
When setting up the drop-down list, we indicate the data source (1) and the calculated field we created (2).
As a result, we get a simultaneous display of the article and code:

If you find it difficult to immediately write the required request text, you can make a “stub” and write a comment explaining what should be implemented here:
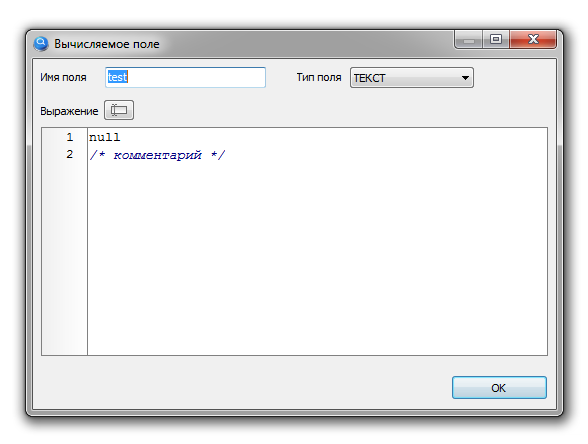
This will allow you to use this calculated field in tables without causing an SQL query construction error. In addition, if you leave the “Expression” field empty, then the next time you open the project, this calculated field will disappear from the list of table fields.
Data filtering


Data filtering mechanisms for tables and drop-down lists are also implemented in SQL. The topic is extensive and will be discussed in a separate section.
Button with SQL query

The My Visual Database Component Palette uses a button (1) to perform most actions, which is described in detail in the “Magic Button” section. Let me remind you that the type of action of a button is determined by its Action property. It’s time to find out what you can do using this button (2) if you select Action = SQL QUERY.
The button configuration form will appear:

In addition to the field for entering an SQL command (1), the form contains additional elements that will help with writing: a button (2) to open the Expression Editor, which is described above; link (3) to the My Visual Database forum, where you can find examples of writing SQL commands or ask a question to the developer community; link (4) to the SQLite documentation, in particular to the list of SQL language keywords.
☝ This list is useful not only for composing SQL queries, but also for preventing errors related to the uniqueness of identifiers: the names of fields and tables should not coincide with SQL language keywords. If for some reason you need to use reserved words as field and table identifiers, then when composing SQL commands, such identifiers will have to be wrapped in double quotes.
If an SQL command (for example, SELECT) returns data, then to display it you can specify a tabular interface element (6) placed on the same form as the button. You can also specify field labels by separating them with a comma.
☝ For queries in which the FROM clause appears multiple times, you must specify the main table (7) . This is due to the implementation of internal algorithms of My Visual Database, in particular – determining the table to be edited when opening the editing form based on the first occurrence of this expression.
Don’t forget to save the settings using the OK button (8).
Let’s display the contents of the item table using a query. Enter the following SQL query in the editor, select the table to display, and save the settings. Note that the last column contains the entry ID. This may be necessary if you plan to use standard MVD capabilities for editing tabular data – buttons with actions [NEW RECORD], [SHOW RECORD] and [DELETE RECORD]

☝ If you want to hide a column, then you need to write delete_col as a signature for this column

The result is not exactly what is expected – the price column was displayed not in monetary format, but in floating point format. How this can be corrected using a script will be discussed in the third part of the advanced course.
Substituting data from a form
MVDB has a mechanism for substituting values from visual components into an SQL query at the time of its execution. For example, to filter data by specified conditions. To substitute a value, specify the name of the component in curly braces in the text of the SQL query or filter.
☝ This mechanism assumes that the visual component will have a specific value selected because it uses its own SQL syntax to handle the NULL value.
📝 Substituting values from visual components is commonly used when filtering data.
Displaying service fields
My Visual Database can add service fields with checkers or sequence numbers if you specify special field names:
| Name | Result |
|---|---|
| “$checkbox” | A field with a checker will appear |
| “$autoinc” | A field with the serial number of the table component row will be displayed |
SELECT
  "$checkbox",
  "$autoinc",
  data
FROM
  test
Code language: SQL (Structured Query Language) (sql)
☝ This trick only works when displaying the query result in a table view.
Complex sorting
In MVDB, in addition to a simple sorting mechanism, which is set by selecting the appropriate field from a drop-down list, it is possible to set sorting using SQL, which allows you to sort data by several fields at once, both ascending and descending and in various combinations.

Sorting is described in more detail in a separate section.
SQL Executor
For further research, we will create an application that will allow us to gain full control over the database.

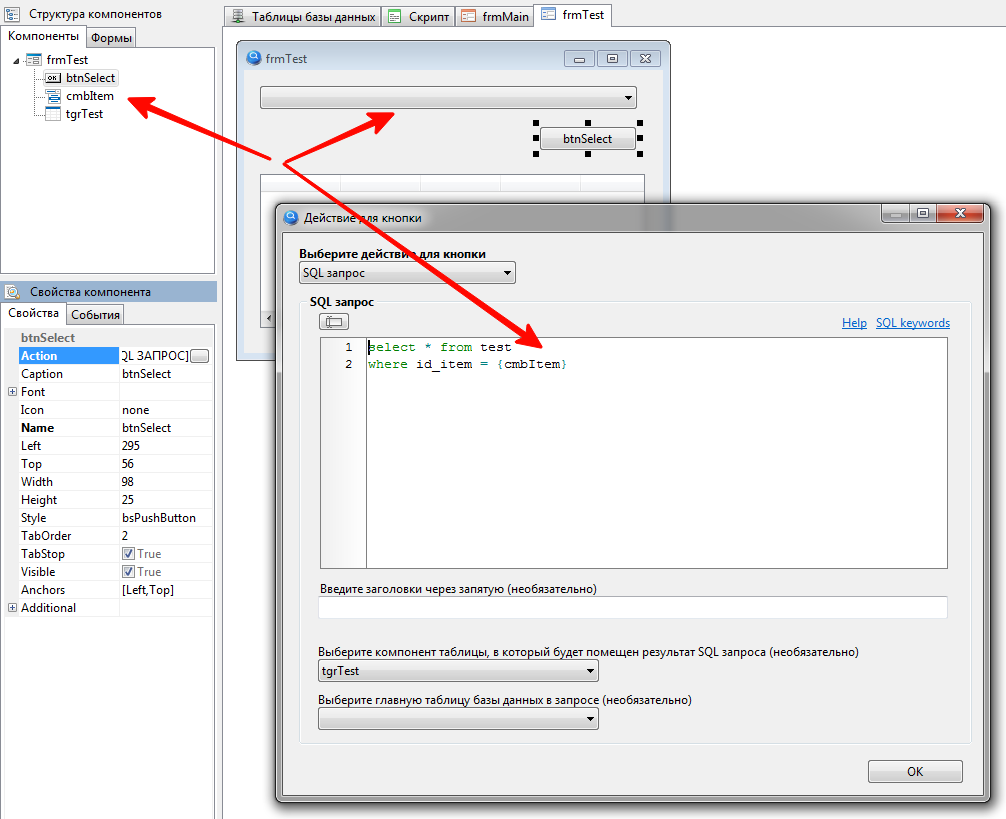
Place a memo field, button and table (1) on the form. Select the button (2) and configure its Action property (3) – select the SQL query action (4), and in the query field, enter the name of the memo field enclosed in curly braces (5); select the table to display the result (6) and save the settings (7).
As a result, we get a program for executing SQL queries, when creating which you did not write a single line of code.
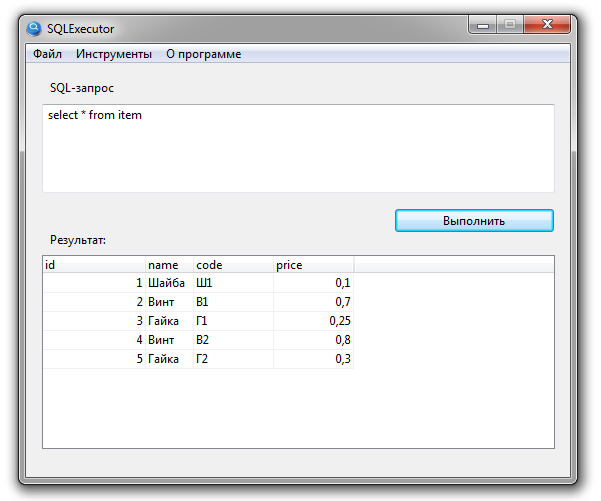
☝ You must use only double quotes to denote string values in this application. Using single quotes doubles them. This built-in logic works when using the value from the Memo field as the value in an SQL query, but fails if the Memo contains the entire query.
Now for a little practice – create your application and connect it to the database!